Image understanding
-
Gemini models can process images, enabling many frontier developer use cases that would have historically required domain specific models. Some of Gemini's vision capabilities include the ability to:
-
- Caption and answer questions about images
- Transcribe and reason over PDFs, including up to 2 million tokens
- Detect objects in an image and return bounding box coordinates for them
- Segment objects within an image
-
Gemini was built to be multimodal from the ground up and we continue to push the frontier of what is possible. This guide shows how to use the Gemini API to generate text responses based on image inputs and perform common image understanding tasks.
-
Before you begin
-
Before calling the Gemini API, ensure you have your SDK of choice installed, and a Gemini API key configured and ready to use.
-
Image input
-
You can provide images as input to Gemini in the following ways:
-
- Upload an image file using the File API before making a request to
generateContent. Use this method for files larger than 20MB or when you want to reuse the file across multiple requests. - Pass inline image data with the request to
generateContent. Use this method for smaller files (<20MB total request size) or images fetched directly from URLs.
- Upload an image file using the File API before making a request to
-
Upload an image file
-
You can use the Files API to upload an image file. Always use the Files API when the total request size (including the file, text prompt, system instructions, etc.) is larger than 20 MB, or if you intend to use the same image in multiple prompts.
-
The following code uploads an image file and then uses the file in a call to
generateContent.
  IMAGE_PATH="path/to/sample.jpg"
  MIME_TYPE=$(file -b --mime-type "${IMAGE_PATH}")
  NUM_BYTES=$(wc -c < "${IMAGE_PATH}")
  DISPLAY_NAME=IMAGE

  tmp_header_file=upload-header.tmp

  # Initial resumable request defining metadata.
  # The upload url is in the response headers dump them to a file.
  curl "https://generativelanguage.googleapis.com/upload/v1beta/files?key=${GOOGLE_API_KEY}" \
    -D upload-header.tmp \
    -H "X-Goog-Upload-Protocol: resumable" \
    -H "X-Goog-Upload-Command: start" \
    -H "X-Goog-Upload-Header-Content-Length: ${NUM_BYTES}" \
    -H "X-Goog-Upload-Header-Content-Type: ${MIME_TYPE}" \
    -H "Content-Type: application/json" \
    -d "{'file': {'display_name': '${DISPLAY_NAME}'}}" 2> /dev/null

  upload_url=$(grep -i "x-goog-upload-url: " "${tmp_header_file}" | cut -d" " -f2 | tr -d "\r")
  rm "${tmp_header_file}"

  # Upload the actual bytes.
  curl "${upload_url}" \
    -H "Content-Length: ${NUM_BYTES}" \
    -H "X-Goog-Upload-Offset: 0" \
    -H "X-Goog-Upload-Command: upload, finalize" \
    --data-binary "@${IMAGE_PATH}" 2> /dev/null > file_info.json

  file_uri=$(jq ".file.uri" file_info.json)
  echo file_uri=$file_uri

  # Now generate content using that file
  curl "https://generativelanguage.googleapis.com/v1beta/models/gemini-2.0-flash:generateContent?key=$GOOGLE_API_KEY" \
      -H 'Content-Type: application/json' \
      -X POST \
      -d '{
        "contents": [{
          "parts":[
            {"file_data":{"mime_type": "${MIME_TYPE}", "file_uri": '$file_uri'}},
            {"text": "Caption this image."}]
          }]
        }' 2> /dev/null > response.json

  cat response.json
  echo

  jq ".candidates[].content.parts[].text" response.json
-
To learn more about working with media files, see Files API.
-
Pass image data inline
-
Instead of uploading an image file, you can pass inline image data in the request to
generateContent. This is suitable for smaller images (less than 20MB total request size) or images fetched directly from URLs. -
You can provide image data as Base64 encoded strings or by reading local files directly (depending on the SDK).
-
Local image file:
-
IMG_PATH=/path/to/your/image1.jpg if [[ "$(base64 --version 2>&1)" = *"FreeBSD"* ]]; then B64FLAGS="--input" else B64FLAGS="-w0" fi curl "https://generativelanguage.googleapis.com/v1beta/models/gemini-2.0-flash:generateContent?key=$GOOGLE_API_KEY" \ -H 'Content-Type: application/json' \ -X POST \ -d '{ "contents": [{ "parts":[ { "inline_data": { "mime_type":"image/jpeg", "data": "'\$(base64 \$B64FLAGS \$IMG_PATH)'" } }, {"text": "Caption this image."}, ] }] }' 2> /dev/null -
Image from URL:
-
IMG_URL="https://goo.gle/instrument-img" MIME_TYPE=$(curl -sIL "$IMG_URL" | grep -i '^content-type:' | awk -F ': ' '{print $2}' | sed 's/\r$//' | head -n 1) if [[ -z "$MIME_TYPE" || ! "$MIME_TYPE" == image/* ]]; then MIME_TYPE="image/jpeg" fi if [[ "$(base64 --version 2>&1)" = *"FreeBSD"* ]]; then B64FLAGS="--input" else B64FLAGS="-w0" fi curl "https://generativelanguage.googleapis.com/v1beta/models/gemini-2.0-flash:generateContent?key=$GOOGLE_API_KEY" \ -H 'Content-Type: application/json' \ -X POST \ -d '{ "contents": [{ "parts":[ { "inline_data": { "mime_type":"'"$MIME_TYPE"'", "data": "'$(curl -sL "$IMG_URL" | base64 $B64FLAGS)'" } }, {"text": "Caption this image."} ] }] }' 2> /dev/null -
A few things to keep in mind about inline image data:
-
- The maximum total request size is 20 MB, which includes text prompts, system instructions, and all files provided inline. If your file's size will make the total request size exceed 20 MB, then use the Files API to upload an image file for use in the request.
- If you're using an image sample multiple times, it's more efficient to upload an image file using the File API.
-
Prompting with multiple images
-
You can provide multiple images in a single prompt by including multiple image
Partobjects in thecontentsarray. These can be a mix of inline data (local files or URLs) and File API references. -
# Upload the first image IMAGE1_PATH="path/to/image1.jpg" MIME1_TYPE=$(file -b --mime-type "${IMAGE1_PATH}") NUM1_BYTES=$(wc -c < "${IMAGE1_PATH}") DISPLAY_NAME1=IMAGE1 tmp_header_file1=upload-header1.tmp curl "https://generativelanguage.googleapis.com/upload/v1beta/files?key=${GOOGLE_API_KEY}" \ -D upload-header1.tmp \ -H "X-Goog-Upload-Protocol: resumable" \ -H "X-Goog-Upload-Command: start" \ -H "X-Goog-Upload-Header-Content-Length: ${NUM1_BYTES}" \ -H "X-Goog-Upload-Header-Content-Type: ${MIME1_TYPE}" \ -H "Content-Type: application/json" \ -d "{'file': {'display_name': '${DISPLAY_NAME1}'}}" 2> /dev/null upload_url1=$(grep -i "x-goog-upload-url: " "${tmp_header_file1}" | cut -d" " -f2 | tr -d "\r") rm "${tmp_header_file1}" curl "${upload_url1}" \ -H "Content-Length: ${NUM1_BYTES}" \ -H "X-Goog-Upload-Offset: 0" \ -H "X-Goog-Upload-Command: upload, finalize" \ --data-binary "@${IMAGE1_PATH}" 2> /dev/null > file_info1.json file1_uri=$(jq ".file.uri" file_info1.json) echo file1_uri=$file1_uri # Prepare the second image (inline) IMAGE2_PATH="path/to/image2.png" MIME2_TYPE=$(file -b --mime-type "${IMAGE2_PATH}") if [[ "$(base64 --version 2>&1)" = *"FreeBSD"* ]]; then B64FLAGS="--input" else B64FLAGS="-w0" fi IMAGE2_BASE64=$(base64 $B64FLAGS $IMAGE2_PATH) # Now generate content using both images curl "https://generativelanguage.googleapis.com/v1beta/models/gemini-2.0-flash:generateContent?key=$GOOGLE_API_KEY" \ -H 'Content-Type: application/json' \ -X POST \ -d '{ "contents": [{ "parts":[ {"text": "What is different between these two images?"}, {"file_data":{"mime_type": "'"${MIME1_TYPE}"'", "file_uri": '$file1_uri'}}, { "inline_data": { "mime_type":"'"${MIME2_TYPE}"'", "data": "'"$IMAGE2_BASE64"'" } } ] }] }' 2> /dev/null > response.json cat response.json echo jq ".candidates[].content.parts[].text" response.json -
Get a bounding box for an object
-
Gemini models are trained to identify objects in an image and provide their bounding box coordinates. The coordinates are returned relative to the image dimensions, scaled to [0, 1000]. You need to descale these coordinates based on your original image size.
-
PROMPT="Detect the all of the prominent items in the image. The box_2d should be [ymin, xmin, ymax, xmax] normalized to 0-1000." -
You can use bounding boxes for object detection and localization within images and video. By accurately identifying and delineating objects with bounding boxes, you can unlock a wide range of applications and enhance the intelligence of your projects.
-
Key benefits
-
- Simple: Integrate object detection capabilities into your applications with ease, regardless of your computer vision expertise.
- Customizable: Produce bounding boxes based on custom instructions (e.g. "I want to see bounding boxes of all the green objects in this image"), without having to train a custom model.
-
Technical details
-
- Input: Your prompt and associated images or video frames.
- Output: Bounding boxes in the
[y_min, x_min, y_max, x_max]format. The top left corner is the origin. Thexandyaxis go horizontally and vertically, respectively. Coordinate values are normalized to 0-1000 for every image. - Visualization: AI Studio users will see bounding boxes plotted within the UI.
-
For Python developers, try the 2D spatial understanding notebook or the experimental 3D pointing notebook.
-
Normalize coordinates
-
The model returns bounding box coordinates in the format
[y_min, x_min, y_max, x_max]. To convert these normalized coordinates to the pixel coordinates of your original image, follow these steps: -
- Divide each output coordinate by 1000.
- Multiply the x-coordinates by the original image width.
- Multiply the y-coordinates by the original image height.
-
To explore more detailed examples of generating bounding box coordinates and visualizing them on images, review the Object Detection cookbook example.
-
Image segmentation
-
Starting with the Gemini 2.5 models, Gemini models are trained to not only detect items but also segment them and provide a mask of their contours.
-
The model predicts a JSON list, where each item represents a segmentation mask. Each item has a bounding box ("
box_2d") in the format[y0, x0, y1, x1]with normalized coordinates between 0 and 1000, a label ("label") that identifies the object, and finally the segmentation mask inside the bounding box, as base64 encoded png that is a probability map with values between 0 and 255. The mask needs to be resized to match the bounding box dimensions, then binarized at your confidence threshold (127 for the midpoint). -
PROMPT=''' Give the segmentation masks for the wooden and glass items. Output a JSON list of segmentation masks where each entry contains the 2D bounding box in the key "box_2d", the segmentation mask in key "mask", and the text label in the key "label". Use descriptive labels. ''' -
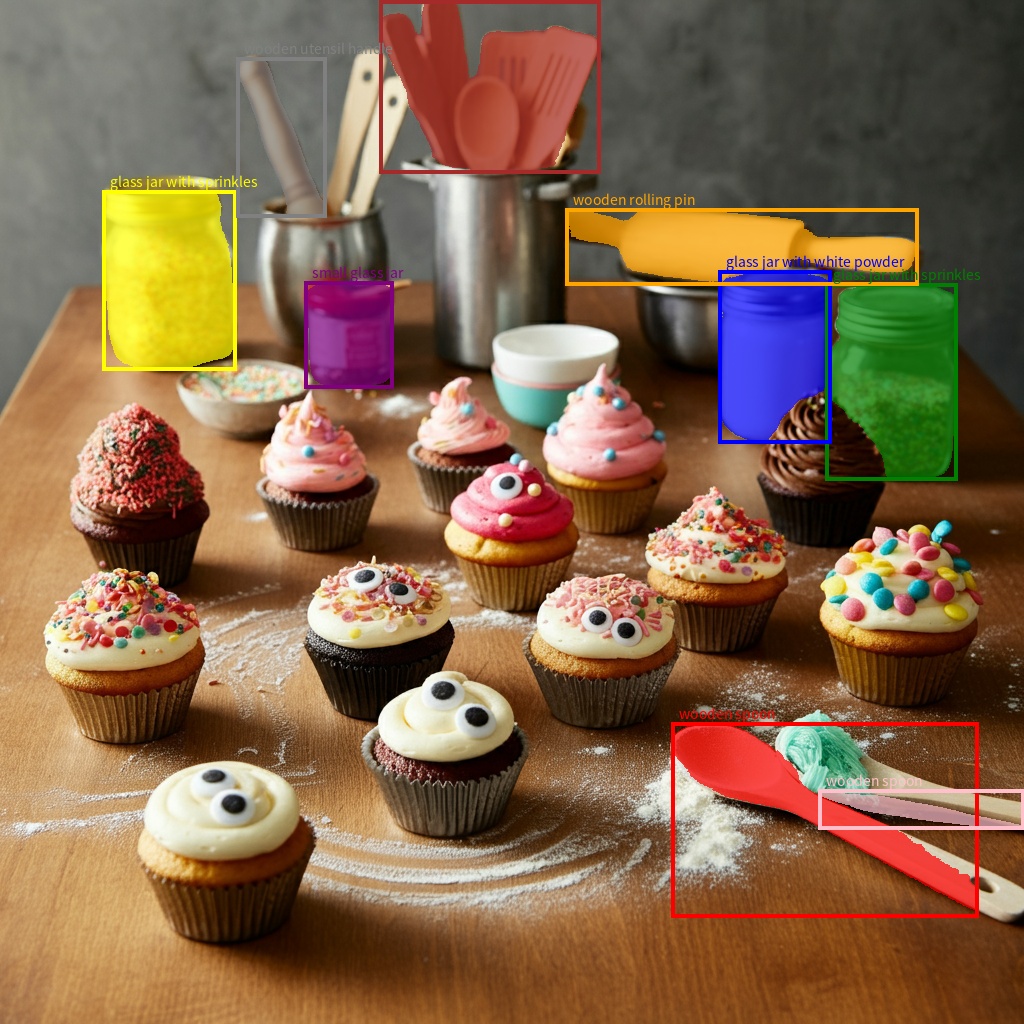 Mask of the wooden and glass objects found on the picture
 -
Check the segmentation example in the cookbook guide for a more detailed example.
-
Supported image formats
-
Gemini supports the following image format MIME types:
-
- PNG -
image/png - JPEG -
image/jpeg - WEBP -
image/webp - HEIC -
image/heic - HEIF -
image/heif
- PNG -
-
Technical details about images
-
-
File limit: Gemini 2.5 Pro, 2.0 Flash, 1.5 Pro, and 1.5 Flash support a maximum of 3,600 image files per request.
-
Token calculation
- Gemini 1.5 Flash and Gemini 1.5 Pro: 258 tokens if both dimensions <= 384 pixels. Larger images are tiled (min tile 256px, max 768px, resized to 768x768), with each tile costing 258 tokens.
- Gemini 2.0 Flash: 258 tokens if both dimensions <= 384 pixels. Larger images are tiled into 768x768 pixel tiles, each costing 258 tokens.
-
Best practices
- Ensure images are correctly rotated.
- Use clear, non-blurry images.
- When using a single image with text, place the text prompt after the image part in the
contentsarray.
-
-
What's next
-
This guide shows how to upload image files and generate text outputs from image inputs. To learn more, see the following resources:
-
- System instructions: System instructions let you steer the behavior of the model based on your specific needs and use cases.
- Video understanding: Learn how to work with video inputs.
- Files API: Learn more about uploading and managing files for use with Gemini.
- File prompting strategies: The Gemini API supports prompting with text, image, audio, and video data, also known as multimodal prompting.
- Safety guidance: Sometimes generative AI models produce unexpected outputs, such as outputs that are inaccurate, biased, or offensive. Post-processing and human evaluation are essential to limit the risk of harm from such outputs.